How to Sew a Zipper
Not knowing when to install the zipper in the sewing process is one of the most common beginner mistakes. Adding it too early or too late can lead to uneven seams, twisted fabric, or having to unpick stitches and redo part of your project.
Zipper installation is consistently considered one of the most challenging techniques for new sewists, especially when working on skirts, dresses, and fitted pouches. The confusion usually isn’t about sewing the zipper itself; it’s about understanding the correct order of steps.
So how do you know exactly when to install your zipper so everything comes together smoothly?
What are the Different Types of Zippers?

Before you begin sewing on a zipper, it’s important to know which one your project requires. Choosing the correct option makes zipper sewing much easier.
1. Centered Zipper
This is the most common and beginner-friendly method. The zipper sits centered between the seam allowance, and both sides of the fabric meet evenly over it. You’ll often see this in skirts, dresses, and cushion covers.
Best for:
Beginner garments
Back seams of skirts or dresses
Projects where the zipper is visible
2. Lapped Zipper
With a lapped zipper, one side of the fabric overlaps the other slightly, covering most of the zipper teeth. This creates a more tailored, polished look.
Best for:
Dresses
Side seams
Classic garment finishes
3. Invisible Zipper
Invisible zippers are concealed within the seam, so you only see the pull tab. These require a specific invisible zipper foot for the neatest finish.
Best for:
Formal dresses
Fitted garments
Professional-looking results
Understanding these zipper types helps you decide not only which zipper to buy but also when it should be inserted during construction.
When to Install the Zipper?
The correct timing depends on your project, but generally:
For skirts and dresses: install the zipper after sewing the seam below the zipper opening, but before attaching waistbands or facings.
For pouches or bags: insert the zipper before assembling the full lining or outer structure.
For garments with linings: attach the zipper before closing the lining completely.
Most patterns will indicate when to sew zipper steps into the process, but as a rule of thumb, the zipper is installed once the seam is prepared and stabilized — not at the very end of construction.
What are the Tools You’ll Need?
To make sewing a zipper easier, gather:
A zipper (correct length and type)
Matching thread
Sewing machine
Zipper foot (regular or invisible)
Pins or clips
Seam ripper (just in case)
Iron
Pressing is especially important. Many zipper sewing issues come from skipping this step.
Step-by-Step: How to Sew a Centered Zipper
If you’re new to sewing on a zipper, start with a centered zipper. It’s the most straightforward technique.
Step 1: Prepare the Seam
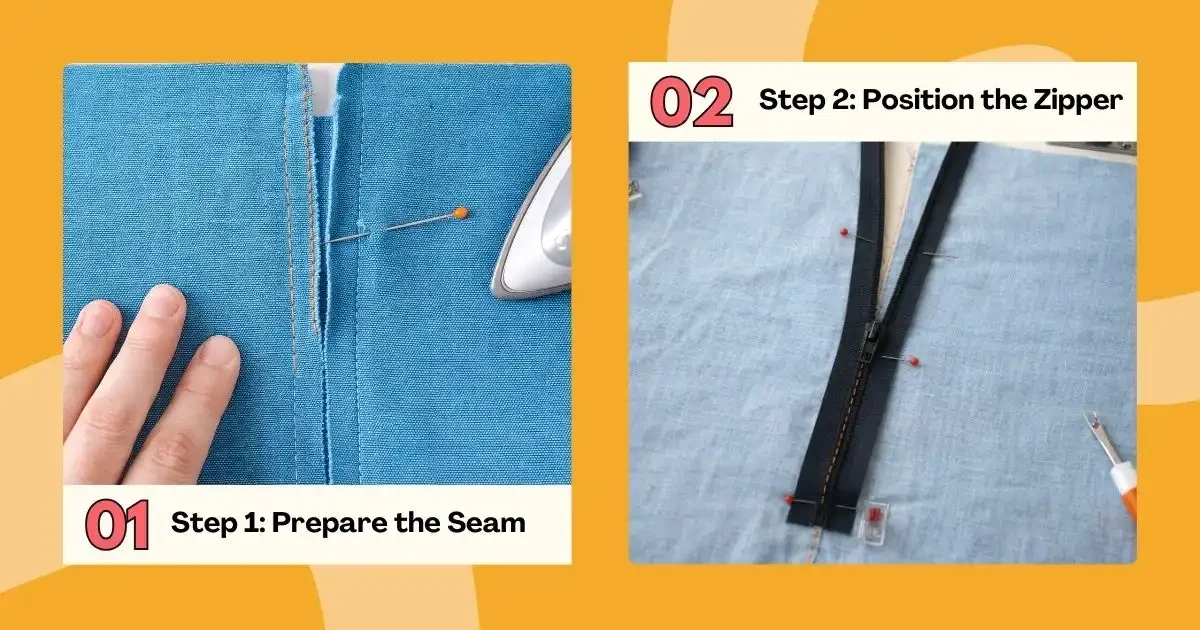
Sew the seam where the zipper will go using a regular stitch until you reach the zipper opening mark. Backstitch at that point. For the zipper area, switch to a long basting stitch and sew the rest of the seam closed temporarily. Press the seam open. This basting step helps keep everything aligned while putting in a zipper.
Step 2: Position the Zipper
Place the zipper face down on the wrong side of the fabric, centered over the basted seam. The zipper teeth should align with the seam line. Pin or clip it in place.
Step 3: Switch to a Zipper Foot
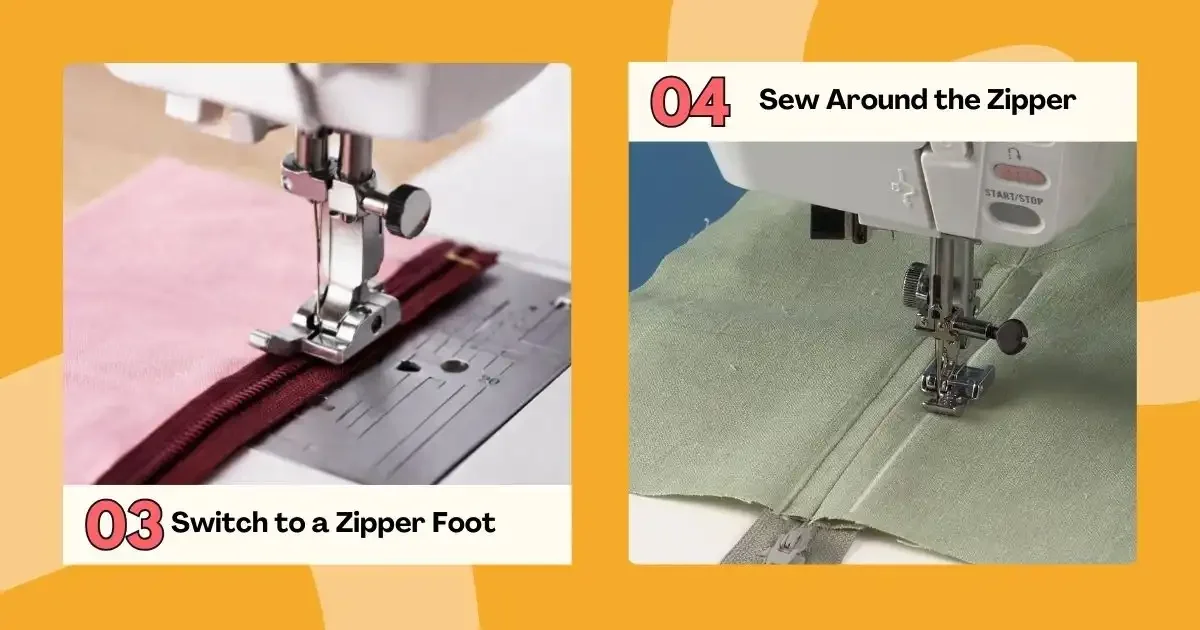
Attach your zipper foot to your sewing machine. This allows you to sew close to the zipper teeth without hitting them.
Step 4: Sew Around the Zipper
Topstitch around the zipper opening on the right side of the fabric. Sew down one side, across the bottom, and up the other side. Keep your stitching even and steady.
Step 5: Remove Basting Stitches
Use a seam ripper to carefully remove the long basting stitches, revealing the zipper underneath. Press lightly — and your centered zipper is complete.
How to Sew an Invisible Zipper
Invisible zippers look intimidating but follow a similar structure.
Key Differences:
The seam is not basted closed.
The zipper is sewn while the seam is still open.
An invisible zipper foot is highly recommended.
Basic Process:
Press the zipper teeth gently to uncurl them.
Place the zipper right sides together with the fabric.
Sew close to the teeth using the invisible zipper foot.
Repeat on the other side.
Sew the remainder of the seam below the zipper.
The result is clean and nearly hidden.
Common Mistakes When Sewing a Zipper
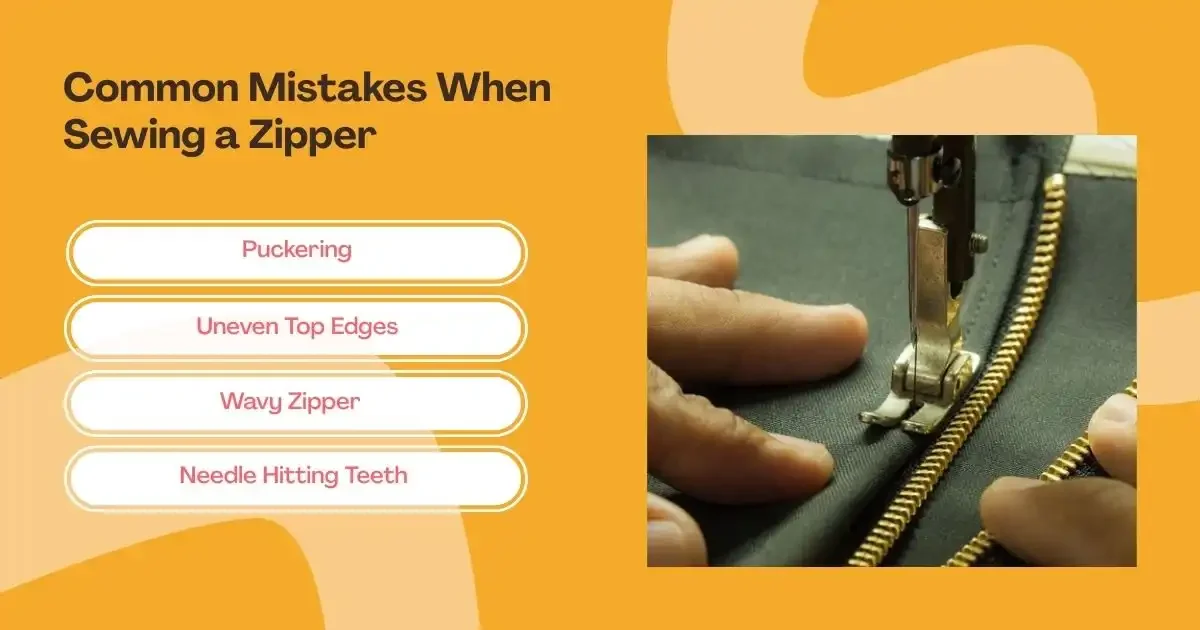
Even experienced sewists run into problems. Here’s how to avoid common issues:
Puckering
Make sure the fabric is flat and pressed.
Avoid stretching lightweight fabric.
Use interfacing for stability if needed.
Uneven Top Edges
Mark seam allowances clearly.
Check that both sides align before stitching.
Wavy Zipper
Don’t pull the fabric while sewing.
Ensure the zipper length matches the opening.
Needle Hitting Teeth
Always use a zipper foot.
Sew slowly and carefully near metal teeth.
Remember, zipper sewing improves with practice. Don’t be discouraged if your first attempt isn’t perfect.
Sewing a Zipper in Garments vs. Accessories
The approach changes slightly depending on the project.
Garments (Skirts, Dresses)
When making a dress using a commercial pattern, the zipper is typically inserted before adding facings or waistbands. It ensures a clean finish at the top edge. Garments may require more precise alignment, especially at waist seams.
Bags and Pouches
For bags, sewing on a zipper usually happens before assembling the lining and exterior together. This makes it easier to access the zipper area flat. Many beginners find practicing on a pouch less intimidating than starting with a garment.
Building Confidence with Zipper Sewing
Many beginners delay projects because they feel unsure about sewing a zipper. But once you understand the structure — seam preparation, positioning, stitching, and finishing — the process becomes predictable.
Like learning different types of stitches, mastering zipper types is simply another skill level in your sewing journey. Start with
A centered zipper on a cushion cover
A simple skirt with a back zipper
A small zippered pouch
Each project builds muscle memory and confidence.
Take the Fear Out of Zipper Sewing
Many beginners avoid projects because they feel unsure about sewing a zipper. Once you understand seam preparation, positioning, stitching, and finishing, the process becomes much easier to manage. Start with simple projects like a cushion cover, a basic skirt, or a small zippered pouch. Each one builds skill, precision, and confidence.
If you would like to build those skills further with guidance and hands-on support, take a look at Cotton Club. Our friendly small-group classes are designed to help you refine techniques like zipper sewing, improve accuracy, and grow your confidence in a relaxed studio setting. You can browse upcoming sessions and find the right level for you on our Sewing Courses. We would love to welcome you into the studio.
Frequently Asked Questions (FAQs)
Can I sew a zipper without a zipper foot?
Yes, although using a zipper foot makes sewing a zipper much easier and more precise. If you don’t have one, you can carefully adjust your regular presser foot position and move the needle slightly to stitch closer to the zipper teeth. However, for cleaner results—especially when putting in a zipper for garments—investing in a zipper foot is highly recommended for smoother zipper sewing.
How do I choose the right zipper length for my project?
When selecting from different zipper types, always follow your pattern’s recommended length. If you’re unsure, measure the seam opening rather than the entire seam. For garment projects involving sewing on a zipper, the opening should match the zipper length exactly. In bag-making, you can sometimes adjust slightly longer zippers, but accuracy is key for professional-looking results.
Are metal or plastic zippers better for beginners?
Among the various types of zippers, nylon coil zippers are generally the easiest for beginners. They’re flexible and more forgiving during sewing a zipper, especially around curves or lightweight fabrics. Metal zippers can look stylish but require slower stitching and extra care when you sew zipper seams to avoid hitting the teeth.
Why does my zipper shift while I’m sewing it
Zipper shifting is often caused by insufficient pinning, skipping basting, or fabric that hasn’t been stabilised. When sewing on a zipper, try hand-basting first for better control, especially with slippery fabrics. Taking this extra step can make zipper sewing far more accurate and reduce the need for unpicking.