How To Sew A Tote Bag
Learning how to sew a tote bag is one of the most useful and satisfying sewing skills you can develop. A tote is practical, stylish, and endlessly adaptable — whether you need something sturdy for groceries, a lightweight book bag, or a polished everyday carryall.
What makes this project especially rewarding is that it builds core sewing skills without feeling overwhelming. From accurate tote bag pattern cutting to assembling strong handles and shaping the base, each step helps improve your confidence and precision. Whether you’re new to sewing tote bag projects or looking to refine your finish, this guide walks you through the entire process clearly and simply.
Why Make a Tote Bag?
Before we dive into the steps, it’s worth mentioning why making a tote bag is such a great project:
It uses mostly straight seams
It’s adaptable in size and style
It’s beginner-friendly but easy to elevate
It makes a thoughtful handmade gift
It’s perfect for groceries, books, or everyday essentials
You can keep it simple with a single layer of cotton or add a lining, pockets, and reinforced handles for a more polished finish.
What Materials Do You Need to Sew a Tote Bag?
To sew tote bag successfully, gather the following:
½–1 metre medium-weight cotton or canvas (for outer)
Optional: same amount for lining
Coordinating thread
Fabric scissors or rotary cutter
Pins or clips
Ruler
Sewing machine
Iron
Optional: interfacing for extra structure
If your fabric is lightweight, adding fusible interfacing will help the bag hold its shape.
How to Choose the Size for Your Tote Bag?
A classic everyday tote measures approximately:
15–16 inches wide
14–16 inches tall
Handles 20–24 inches long
Of course, you can customise the dimensions depending on the bag’s purpose.
8 Steps on How to Sew A Tote Bag
Here are the process of sewing a tote bag:
Step 1: Tote Bag Pattern Cutting
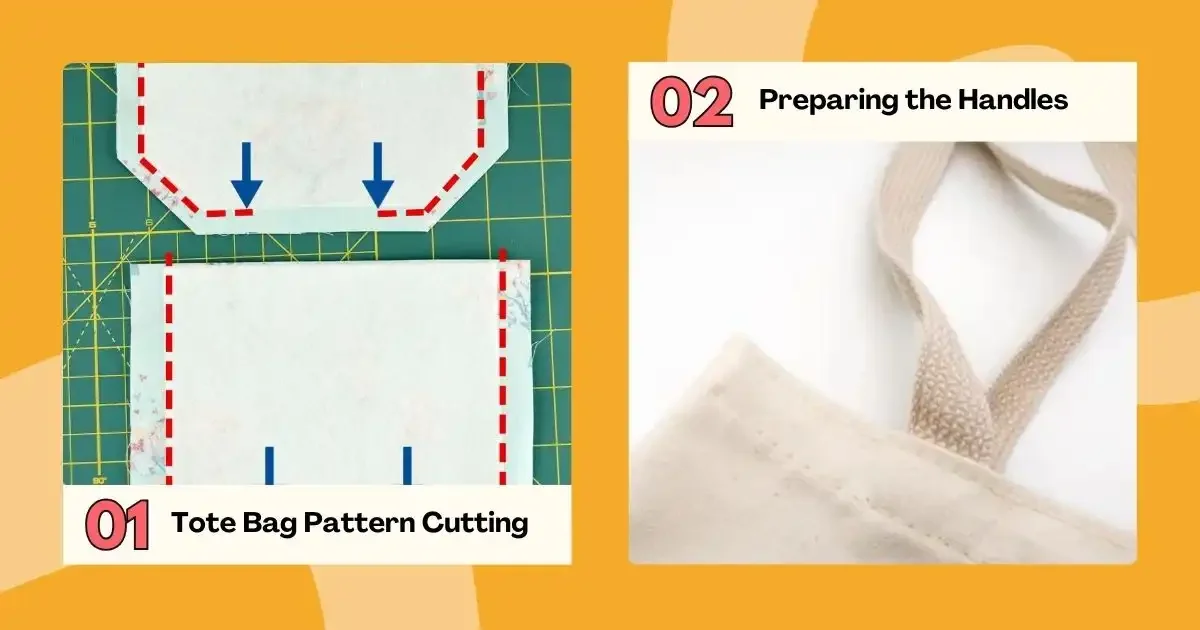
Start by cutting:
2 rectangles for the main body (e.g., 16" x 15")
2 strips for handles (e.g., 4" x 22")
Optional: 2 lining pieces same size as outer
If you’re adding interfacing, cut matching pieces and fuse them to the wrong side of your outer fabric before assembly. Accurate tote bag pattern cutting makes the construction smoother. Measure carefully and ensure your pieces are squared before stitching.
Step 2: Preparing the Handles
Handles are what make a tote functional — and strong handles matter.
Fold each handle strip in half lengthwise and press.
Open it back up and fold each long raw edge into the centre crease.
Fold again along the original centre line to encase the raw edges.
Press well.
Stitch along both long edges to secure.
Topstitching close to the edge gives a neat, professional look and reinforces the strap.
Step 3: Sewing the Main Body

Place your two outer fabric pieces right sides together.
Pin or clip around the sides and bottom.
Stitch with a ½" seam allowance.
Backstitch at the beginning and end.
To prevent fraying, you can zigzag stitch or overlock the raw edges. Press seams open or to one side. If you want a flat, simple tote, you can skip shaping the bottom. If you prefer more structure, continue to the next step.
Step 4: Creating Boxed Corners (Optional)
For a bag that stands up on its own, boxed corners are ideal.
With the bag still inside out, pinch one bottom corner so the side seam aligns with the bottom seam.
Flatten into a triangle.
Measure about 1–2 inches from the tip and draw a straight line across.
Stitch along that line.
Trim excess fabric.
Repeat on the other side. This technique transforms a flat bag into a roomy, structured tote — a great upgrade when sewing tote bag projects.
Step 5: Adding the Lining (Optional)
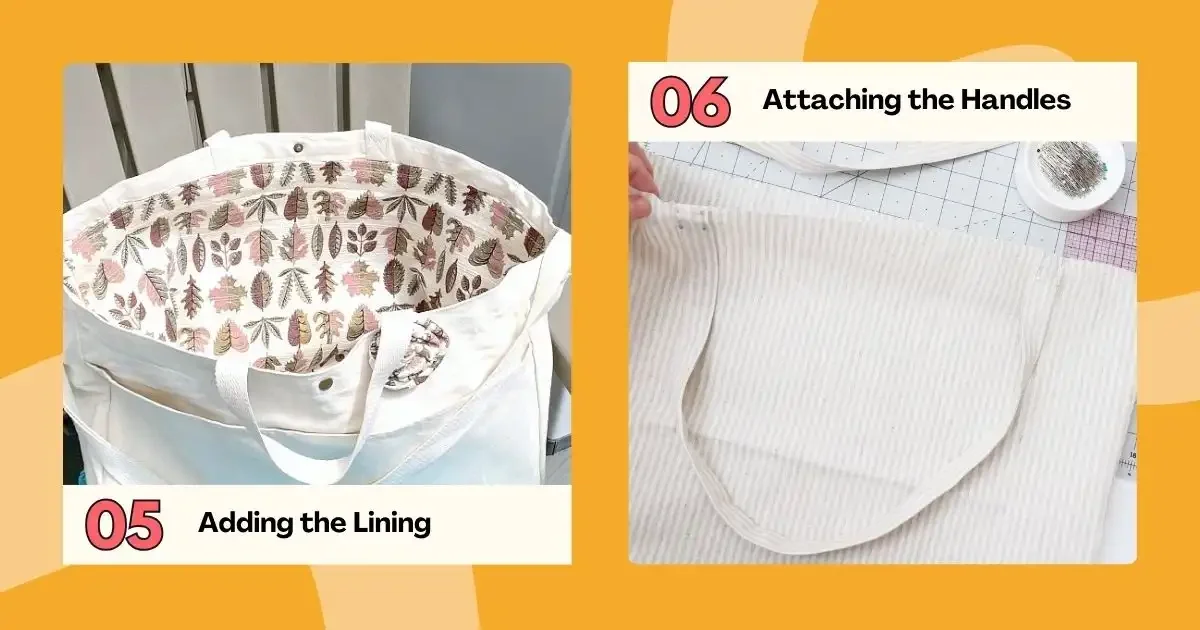
If you’re including a lining:
Sew lining pieces together the same way as the outer, but leave a 3–4 inch opening in the bottom seam for turning.
Keep lining inside out.
Place the outer bag right side out inside the lining (right sides facing). Align seams and top edges.
Step 6: Attaching the Handles
Position your handles evenly along the top edge of the outer bag.
A good rule of thumb:
Place each handle about 2–3 inches from the side seams.
Pin in place with raw edges aligned at the top.
If working with a lining, sandwich the handles between the outer and lining layers.
Step 7: Stitching the Top Edge

Sew around the entire top edge with a ½" seam allowance, catching the handles securely.
If lined:
Pull the bag through the opening in the lining.
Stitch the lining opening closed.
Push lining inside the bag and press the top edge neatly.
Step 8: Topstitch for a Professional Finish
Topstitch around the entire top edge, about ⅛–¼ inch from the edge.
This step:
Strengthens the handle area
Keeps the lining from rolling out
Gives your tote a polished look
At this stage, you’ve successfully learned how to sew a tote bag from start to finish.
How Can You Customise Your Tote Bag?
Once you’re comfortable making a tote bag, there are so many creative ways to personalise your design. You might add exterior pockets for easy access to essentials, or include interior slip pockets to keep items organised. Magnetic snaps are a great addition if you’d like a secure closure without complicating the design.
Decorative topstitching can elevate the overall look, while a contrast lining adds a polished, professional finish. For something more eye-catching, consider incorporating patchwork panels to showcase different fabrics. A simple sewing bag tutorial like this can easily become the foundation for more advanced and creative bag-making projects as your skills grow.
What Fabric Choices Will Give You the Best Results?
Choosing the right fabric makes a significant difference when sewing a tote bag. Canvas or denim creates sturdy, durable everyday bags that can handle heavier items. Quilting cotton works beautifully too, especially when paired with interfacing for added structure.
If you’re working with thicker fabrics, you may need a denim needle to ensure smooth stitching and avoid skipped stitches. Pressing seams as you sew helps maintain crisp structure and clean lines. Although pressing might seem like a small step, it dramatically improves the overall finish and gives your tote a more professional appearance.
What Common Mistakes Should You Avoid When Sewing a Tote Bag?
Even straightforward projects benefit from careful attention to detail. Skipping backstitching on handles can weaken stress points, while uneven handle placement can affect both appearance and comfort. Not reinforcing seams—especially at the top of the bag—may reduce durability over time.
Cutting fabric inaccurately can throw off alignment and structure, and forgetting to press throughout the process can leave your bag looking less polished. Precision truly makes a noticeable difference, even in simple projects like this, and taking your time will always result in a better finish.
Turn Your Tote Bag Skills Into Something Bigger
Learning how to sew a tote bag goes beyond finishing one project. It teaches you how structure, fabric choice, and careful finishing create a bag that truly lasts. From accurate tote bag pattern cutting to reinforcing handles and shaping corners, these skills carry into more advanced sewing projects. Each tote you make strengthens your precision and confidence, helping you achieve cleaner seams and stronger construction every time.
If you would like to build those skills further with guidance and hands-on support, take a look at Cotton Club. Our friendly small-group classes are designed to help you refine techniques, improve accuracy, and grow your confidence in a relaxed studio setting. You can explore upcoming sessions and find the right level for you on our Sewing Courses. We would love to welcome you into the studio.
Frequently Asked Questions (FAQs)
How long does it take to sew a tote bag?
The time it takes to sew tote bag projects depends on the features you include. A simple unlined version can take around 1–2 hours, while a lined or boxed-corner design may take 2–3 hours, especially if you are focusing on accuracy. If you are new to sewing tote bag projects, allow extra time for careful measuring and pressing. Taking your time during tote bag pattern cutting and handle placement will always improve the final result.
Can I sew a tote bag without a pattern?
Yes, you can absolutely sew a tote bag without a printed pattern. Many sewists draft their own measurements using rectangles, which makes the project very beginner-friendly. The key is careful tote bag pattern cutting and ensuring your pieces are symmetrical before stitching. If you prefer more guidance, following a structured sewing bag tutorial can help you understand proportions and balance while still allowing room for customisation.
Is making a tote bag suitable for beginners?
Making a tote bag is ideal for beginners because it introduces straight seams, seam allowances, and topstitching without complex shaping. It is often one of the first structured projects people try when learning to sew tote bag designs. While simple in concept, it still teaches important skills like reinforcing stress points and aligning layers correctly, which build strong foundational technique.
How can I make my tote bag strong enough for heavy items?
If you plan to use your bag for groceries or books, strength comes from construction choices rather than just fabric weight. Reinforcing handle attachment points, using durable thread, and stitching seams securely all contribute to a stronger finish when sewing tote bag projects. You can also double-stitch stress areas or add interfacing for extra support. These small adjustments make a noticeable difference when you sew a tote bag intended for everyday use.